DIY Scale Armor For LARPing
Background
Scale armor has a well known weakness. It does not defend well against an piercing upward thrust.
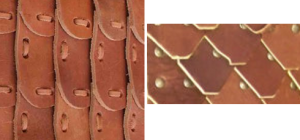
Scale armor is commonly made using scales of either leather or metal. The scales are connected to a base of either leather or cloth. They can be riveted or sewn/laced on. The scales can either be purchased or made from scratch. If you choose to buy pre-made scales. You can skip this step and only need to worry about getting them all connected to a base.
Leather Scales
Leather is the easiest type to build on your own. When building leather scale armor it is important to use somewhat thicker leather.
Before starting be sure to gather the materials needed:
Basic tools and meterials:
- sheet of leather ( aprox. from 2.5mm to 5mm thick )
- razor or utility knife
- leather hole punch ( hand held with hammer and/or rottary )
- plain paraffin wax
- dye
- pot or container boiling water
- pot or container boiling wax
Extra tools and materials:
- Rawhide mallet ( or wooden or plastic )
- Ball peen hammer
- Awl for piercing holes
- Lacing Chisels ( optional ) for punching evenly spaced holes
- Modeling tools ( optional )
- Stamp sets ( optional )
- Edge Beveler ( optional )
- Leather hand needle
- Swivel knife, for cutting patterns on the surface ( optional )
- Strap cutter, for cutting straps ( optional )
- Latex gloves, to protect from dye
The first step will be to decide decide on the shape of the scales. Scales come in many different variations from half leaf shaped to pointed or just rounded on the end. It is up to you but you can base it upon some of the examples we have here. Once you have the shape picked out, draw this onto a piece of cardboard as a template. Then cut out the template so that it can be traced onto a piece of leather. Next, very carefully trace the scales on to the large piece of leather forming an even pattern. Once the pattern has been traced you will need to cut out the individual pieces. This is done with either a heavy duty pair of scisors, a razor, or potentiallly a pair of tin snips. You can make the pieces any size you want but a good rule of thumb would be 5cm by 5cm.
Once the pieces are cut out, you will need to punch holes into the pieces using the leather hole punch. Be sure to mark the spots where the holes will go before actually punching them. Each piece will need to match so measure them carefully and be sure to make each scale the same. Where should the holes actually be punched? What pattern should be used? There is no set in stone pattern to use for the holes and you can change things around to fit however you like but often times the same patterns and techniques keep getting used because they just make sense or are the most straight forward way of doing it. I’ve included some diagrams showing how a common way of arranging the holes and lacing them.
Once the leather scales are done they can be connected usually one of two ways. They can be connected using metal rivets or threaded together with leather lacing. With rivets, you will just need to match up the holes and make sure the scales are all overlapping the way you want. With lacing you will arrange them the same way but you will need to thread the lacing through in a way that makes sense and keeps everything together ( see pictures and diagrams ).
Forming
Forming and shaping is somewhat less important for small scale pieces but you will still want to form them a little bit. To form and shape the leather you will want to first soak it in water. The leather scales should be left to soak for a few hours ( as long as overnight for big pieces but not scales ). Once taken out of the water and dried off a bit, form the pieces into the shape you want and keep them held that way until completely dry. Some people try to heat them in the oven when drying but it isn’t necessary and can make things worse if you can’t get the temperature right.
Hardening: Wax Treatment
Before staring with wax, make sure that the leather scales are dry. If they are even a little bit wet it will become deformed. The leather pieces should be formed in what ever shape you want before starting waxing ( probably flat or slightly curved for scales ). If things aren’t done correctly it could result in the leather not retaining it’s shape as well as it should or not being strong enough. Try to get everything just right. It will take trial and error but will get easier in time.
WARNING – use ventilation and don’t use an open flame vapor from wax can catch fire easily. This is an actual real danger. Also, keep in mind that wax WILL clog your drain so NEVER pour it down the drain. It also pretty much gets permanently stuck to whatever pot you boil it in so don’t use an expensive pot for the wax.
First you will need a smaller pot and a larger pot ( double boiler ). Boil water in the larger pot. Place the wax into the smaller pot and place the smaller pot into the larger pot which has the boiling water. This way you won’t be heating the wax directly. Also be careful, the was is flamable. You will heat the wax up and bring it to a steady temperature. The wax needs to be just hot enough to stay liquid but not too hot or it will cause problems with the leather. Drop the piece into the wax and you should see small bubbles starting to rise. This shows that the was is the right temperature. Leave the leather in until the bubbles stop indicating that the was has been completely absorbed. This will usually take anywhere from 20 to 45 minutes. Watchout and make sure it doesn’t burn at the bottom. Once done, take them out but be careful to support them. Don’t try to shape them at this point as any shaping done after waxing will not last well especially if exposted to heat.
HINT – you can add a few scoops of stearine to the wax to make it stronger and prevent it from melting in the sun as easily.Dye
At this point you will want to dye or stain your armor. More on this to come …..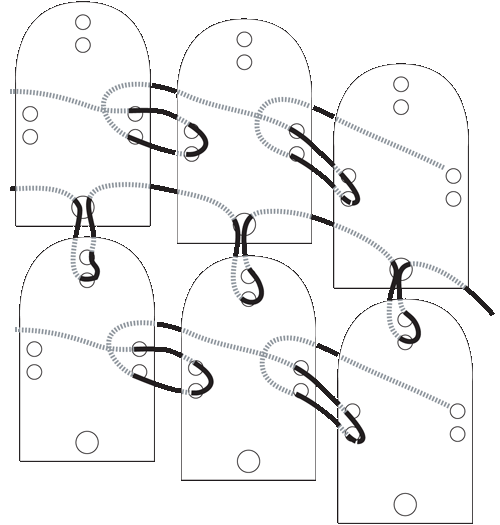
Metal Scales
Metal scales are a bit harder to build yourself. While metal scalse require more time and work it is MUCH more rewarding when you have completed a finished set. Two common choices of metal are brass and steel.
When you decide to make metal scale armor there are two different ways to go and this depends on what you want and what your purpose for the armor is. In the first scenario, if your reason for making the armor is purely for costume and you also want ot save both time and money, then you might decide to make a cheaper set of armor that looks OK. It likely won’t look perfect and won’t be functional but it will get you a usable costume quickly and without spending too much money. If this is what you want then you will want to go with pieces of either tin or aluminum since these are both cheap and very easy to cut. In the second scenario, if you actually want something higher quality that is actually functional you will want to select either brass or steel ( I perfer steel ). These will take more time and be a lot harder to work with but will yield a better set of armor. Chances are this set of armor will cost more to make as well but the biggest difference is time.
Gather materials:
- hacksaw
- ……
There are two main ways to link scale armor. The first method is to connect each plate with rivets using the holes that are punched into the plates. The second method involves linking the plates with rings.
I haven’t finished writing this but the rest of the section on metal scale armor will be finished and posted soon…..